
Managing Alerts from MDATP in ServiceNow – Part I: Bearer Token Request And ServiceNow Connect
At this years MVP Summit the Microsoft Defender Advanced Threat Protection product group initiated a hackathon. I had the please to group up with Hasain Alshakarti, Marcel Meurer and Gregor Reimling. We digged into the scenario of combining MDATP with ServiceNow where we tried to automate the workflow around incidents. As this scenario looked kind of promising I took the item from the summit to my sepago security team and continued our work with their support.
What do we want to achieve:
A common problem in the IT-security industry, espacially in enterprise enviroments, is the fact, that analysts and in general blue teams have to handle a variety of applications running in parallell. As a result of this, daily operations take place in diffrent applications, programming languages and sometimes even environments. The relevant information is split across diffrent solutions and hard to bring into context in case of an incident. To follow the “single pane of glass” idea, we want to make the workflow as easy as possible. For this project we will leverage the power of the MDATP API and automate the part of opening incidents in ServiceNow, simplify things even more, we are going to show how the security analyst can identify and close false-positves just by looking into his mailbox.
Prerequisites:
Before you are able to programmatic access MDATP you need to create an Azure Active Directory application. With that you can get an access token to Microsoft Defender ATP and validate the token. All steps needed are described in the guide: “Create an app to access Windows Defender ATP without a user“.
The application needs at least read/write permission for the alerts entity in MDATP. Of course, since this is about the integration in ServiceNow, you need an instance of the platform, if you don’t have your own, you can sign up for a developer account and can tinker with a demo instance. You can get your own instance right here: https://developer.servicenow.com/app.do#!/home
In our example we used Python for the scripting part, and had installed the module “Requests”, http://docs.python-requests.org/en/master/, it is released under the Apache License Version 2.0 since this beautiful piece of software makes web requests very comfortable. These Scripts were only tested for the “Madrid” Version of ServiceNow, so there is no guarantee that they’ll work with other instances as well.
Ressources:
MDATP Alert API documentation: https://docs.microsoft.com/en-us/windows/security/threat-protection/windows-defender-atp/alerts-windows-defender-advanced-threat-protection-new
ServiceNow API documentation: https://developer.servicenow.com/app.do#!/rest_api_doc?v=madrid&id=r_TableAPI-POST
ServiceNow Guide for the Incident API: https://docs.servicenow.com/bundle/madrid-application-development/page/integrate/inbound-rest/concept/c_GettingStartedWithREST.html#t_GetStartedCreateInt
ServiceNow E-Mail API documentation: https://docs.servicenow.com/bundle/madrid-application-development/page/integrate/inbound-rest/concept/email-api.html#r_email-api-post
Lets get started.
To authenticate we need a so called Bearer Token, before we can call the MDATP API we have to call https://login.windows.net/%s/oauth2/token/<YourTenantID>
This is what my code looks like:
import json
import requests

#########################- Bearer Token Request -###################

tenantId = ##PasteYourOwnTenantIdHere##
appId = ##PasteYourOwnAppIdHere##
appSecret = ##PasteYourOwnAppSecretHere##

aadUrl = 'https://login.windows.net/%s/oauth2/token' % (tenantId)
resourceAppIdUri = 'https://api.securitycenter.windows.com'

body = {
    'resource' : resourceAppIdUri,
    'client_id' : appId,
    'client_secret' : appSecret,
    'grant_type' : 'client_credentials'
}

reqAAD = requests.post(aadUrl, body)
jsonResponseAad = reqAAD.json()
bearerToken = jsonResponseAad['access_token']
This example is a little bit different than the one on the docs.microsoft.com, so let me explain the lines starting at the top.
We import the module “json”, to easily handle json objects and the module “requests”, to handle the API calls. “Requests” If you want to use this, you have to paste your own information at the marked parts.
We put together the OAuth URL. To tell the AAD which service we want to use the token. To get the right one, we have to give the resource-App-Id-Uri, as shown in the code.
To know how we have to speak to the API, we studied the docs. We need the body with the resource, client_id, client_secret and the grant_type fields.
After we saved all this information in variables, we made the actual request and save the returned Request-Object.
All set. For the next call you’ll only need a Bearer Token.
The request for the MDATP API looks not much different than the first and is build quite similar:
####################- MDATP Request -###################

mdatpUrl = 'https://api.securitycenter.windows.com/api/alerts'
headerMDATP ={'Authorization' : 'Bearer ' + bearerToken}
reqMDATP = requests.request(method='GET', url=mdatpUrl, headers=headerMDATP)
jsonResponseMdatp = reqMDATP.json()
The Result is the JSON part of the response saved in jsonResponseMdatp.
To push these alerts in ServiceNow we have to do some mapping of the values, since both APIs have different names for the things, we need to define the credentials, URL and have to put together the new request.
#########################- Alert push SNOW/open incident -###################

urlSNOWINC = 'https:// ##YourInstanceName##.service-now.com/api/now/table/incident'
urlSNOWMAIL = 'https://##YourInstanceName##.service-now.com/api/now/email'

user = ##YourUsername##
pwd = ##YourPassword##

incidentList = []

for id in jsonResponseMdatp:
bodyIncident = None
print(id['id'])
bodyIncident = {
    'number' : id['id'],
    'source' : 'MDATP API',
    'short_description' : id['title'],
    'description' : str(id['description']) + '\n\nComment from MDATP:' + str(id['comments']),
    'event_class' : id['category'],
    'node' : id['machineId'],
    'company' : 'DemoTenant',
    'caused_by' : id['detectionSource']
}
reqSNOW = requests.request(method='POST', auth=(user, pwd), url=urlSNOWINC, data=json.dumps(bodyIncident))
print(reqSNOW.status_code)
incidentList.append(id['id'])

print('Upload from MDATP2ServiceNow DONE!')
bodyMail= {
    'to' : [
        '##YourName## ##YourName@Domain.YourTLD##',        #Format here: 'Name <YourMail@YourDomain.YourTLD>'
    ],
    'subject' : 'New Incidents got in!',
    'text' : str(incidentList),
}

reqSnowMAIL = requests.request(method='POST', auth=(user, pwd), url=urlSNOWMAIL, data=json.dumps(bodyMail))

print(reqSnowMAIL.status_code)
print(reqSnowMAIL.json())
Here we iterate over every element we got back from the MDATP API and map the relevant data to the fields in ServiceNow. Here we can select every field that is shown in here : https://developer.servicenow.com/app.do#!/rest_api_doc?v=madrid&id=r_TableAPI-POST.
It’s everyones challenge to find the relevant fields for the business, so we covered only a few. To make it some kind of unnecessary to track which alerts already are incidents in ServiceNow, we create the incident with the alert ID from MDATP, so next time we POST the alerts to ServiceNow, we can easily look up if the ID already exists. Everytime we make a POST to the API we check for the HTTP status code, to track if it was successful, in this case code 201. We could as well append every incident from this bulk upload to a list of incidents.
Example of the ServiceNow GUI with the imported Incidents:
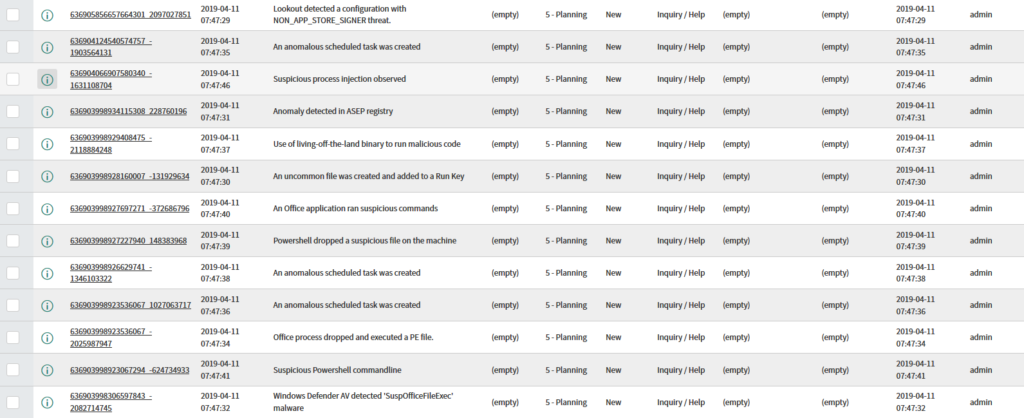
When we are done uploading, we send the list with the new incidents to the admins or analysts for the next steps. In this case the incidents are all in one list, for testing.
Watch out, if you have a Test-Instance of ServiceNow, maybe your Mail-Service isn’t configuered to send out the mails. Then you have to activate this feature in the Config. Be careful that the queue isn’t to long, otherwise you will get all the mails at once. 🙂
This is the end of the first part of the series, so let’s have a look at what we covered so far:
We pulled the alerts from MDATP, did some mapping to push the alerts as incident tickets in ServiceNow and send an E-Mail to the analysts, so they know that some work arrived.
The next step will be, to make these mails interactive, so when the analyst or red team did some tests and the reciever of the mail knows that the particular incident is a false positive, they can close the incident out of the mail in no time.
Interested? Then stay tuned…