Windows 10 Enterprise Serie – Windows Business Store
>> find out more: Blogposts about Windows 10
1.1 Introduction
The Windows Store is a feature that has first been introduced with Windows 8.
Most customers simply deactivated the store functionality via Group Policy as, although somewhat popular in the consumer market, was lacking some essential business related functionalities.
As the name already indicates, the newly released “Windows 10: Store for Business” might have some business related improvements up its sleeve.
So let us take a look at these improvements. Have some functionalities been released that are useful in a productive environment and that might complement the available Software Management tools? If so, is it worth the effort? What are the technical requirements for a possible Store for Business implementation? Are there any downsides? Pro’s and Con’s?
1.2 Overview – Store for Business
The Windows Store for Business is a functionality that seamlessly integrates with the built-in Windows 10 store application. The store app itself is available in the home edition but not the so called private store.
The private store functionality provides IT Administrators with the capability to manage (purchase, license, distribute) public apps and to publish them into the private store of end-users.
End-users are then able to install these published apps out of the private store.
One great functionality of app licensing, is the possibility of Administrators to revoke and redistribute an app specific license.
Also, in addition to the distribution of public apps, private Line-of-Business (LOB) apps of trusted developers can be integrated and distributed to the whole company or to individual users using the store’s management page or the preferred Software management solution.
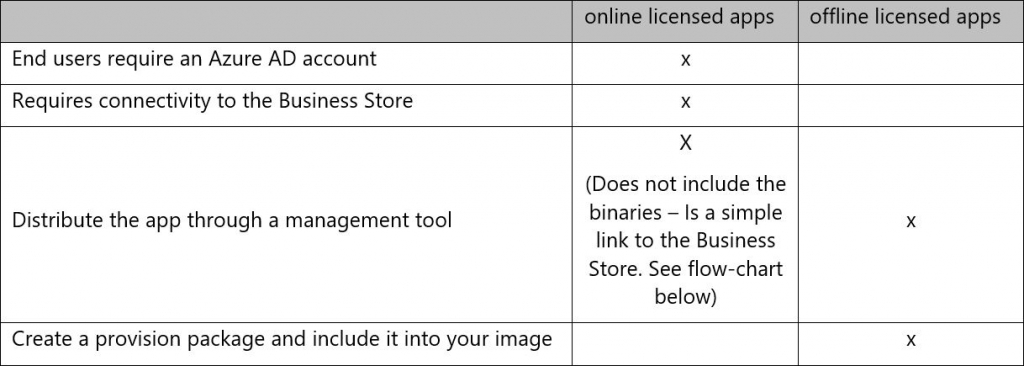
There are two different licensing models for apps, the offline licensed and the online licensed.
The key differences between these two licensing models, is that offline licensed apps do not require the end users to have an Azure AD account. Instead, only the Administrator requires an Azure AD account to authenticate against the store and to manage the apps.
In addition, offline licensed apps can be downloaded, packaged and can then be integrated into your corporate image or deployed to clients using the preferred Software Management solution.
Note that not all apps will support the offline license model. This is an optional support model, which has to be enabled by the apps vendor.
Microsoft provides a great flow-chart for the key differences between online and offline licensed application deployments, which can be reviewed in the following TechNet article: https://technet.microsoft.com/en-us/library/mt592935%28v=vs.85%29.aspx
1.3 Technical Requirements
The Windows Store for Business relies on Azure Active Directory, which is why:
- The company requires Azure AD and as such Administrators require an Azure AD account to sign up for the Store for Business and to manage it
- End Users require an Azure AD account if they want to access the Store for Business and if they want to install online-licensed apps
- End Users do not require an Azure AD account if they only require access to offline-licensed apps
Additionally the latest and greatest Windows 10 version is required (currently Version 1511) on both PC and mobile devices.
2 Store for Business – Implementation
After that short introduction and overview, you probably want to know what the Store for Business looks like? How to deploy, configure, and install it? What is the look and feel for end users?
So let us start with the “deployment” of the Store for Business. The assumption is that you have your Azure AD account at hand and that your account is eligible to administer the Store for Business.
As a first highly complicated technical step, please start your preferred web browser, navigate to: https://Businessstore.microsoft.com and sign in with your organizational account.
At first sign-up, please carefully read the Service Agreements. This is up to you but you may potentially want to accept the agreement.
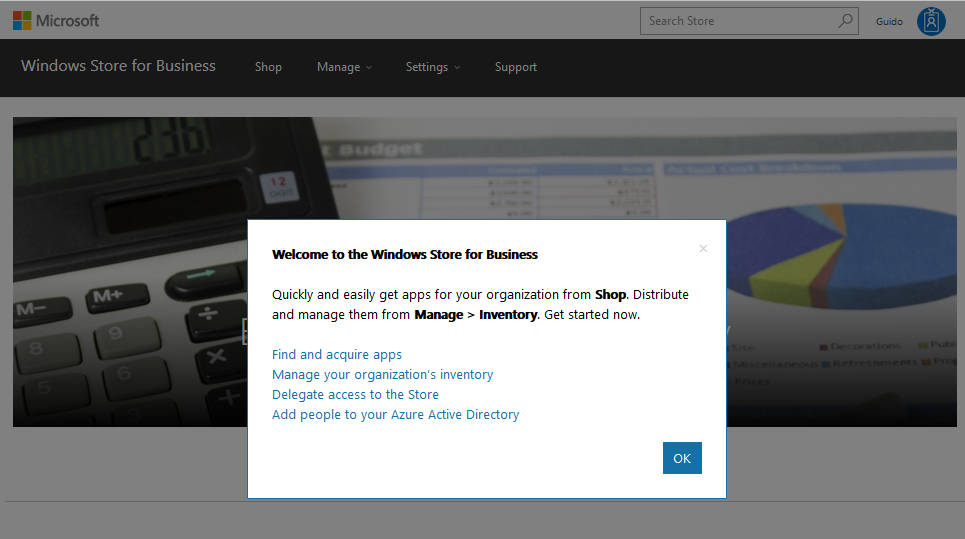
Once accepted, you will be welcomed to your Windows Store for Business:
That’s it! We successfully enabled the Windows Store for Business within your company.
As a next step, we can start with the store configuration and with the deployment of apps.
2.1 Store for Business – initial configuration
The configuration items for the Windows Store for Business can be found in the Settings tab:
Each tab currently has the following possible configuration items. This may change in future releases, so you may want to check your portal for any possible configuration item changes.
Account Information: Is a simple information tab, which displays your Organization name, Default domain and language preferences.
Device Guard signing: lets administrators:
- Upload and sign catalog and policy files for use with Device Guard to ensure code integrity
- Download a default code integrity policy file for use with Device Guard
- Download your organization’s root certificate file for use with Device Guard.
Please have a look at “BLOGPOST DEVICE GUARD LINK” if you are interested in Device Guard
LOB publishers: Invite publishers to submit apps to your organization.
Management tools: Lets you configure a Mobile Device Management (MDM) tool to synchronize your Store for Business inventory (Note that the tool has to be available within Azure Active Directory).
Offline licensing: Show offline licensed apps- this needs to be enabled if you want to see offline licensed apps within the app store. It is highly recommended to enable this setting.
Permissions: Let people in your organization buy and manage apps, and administer the account.
Private store: Change the private store display name
2.2 Add an online app to your store
Now that the Store for Business is configured to our needs, the next step is to add and deploy some apps. To do so, either navigate to “Shop” or search the store
Select an application of your choice and click on “Get the App”:
Choose how you want to distribute the application:
Add to your private store: This will simply deploy the app to the private store, which will make it available to the whole company
Assign to people: You can enter the name or the email addresses of specific employees
Distribute later: This will deploy the app to the private store but will not publish it to any end users until released.
Note: There is currently no option to deploy an app to a specific group. You can either deploy an app to the whole organization or to a list of eligible users.
The app will be added to your private store.
To check the apps distribution status, go to Manage -> Inventory. The newly added app will be displayed with the status “Add in progress”.
Note that the sync between the Store and clients can take up to 12 hours, meaning that newly added applications will not be displayed directly.
2.3 Look and feel – Without Private Store
As the store settings are being synced, let us have a look at the end users perspective.
Without configuration, an end user that logs on to his client and starts the Windows Store will have the following setup – Sign in:
If the user chooses to sign in, he will have the option to either logon with his Microsoft account (formerly live ID) or with his work or school account.
If an end user tries to buy app store related content, they will receive a similar logon prompt but will not have the option to logon with their work account.
This is due to the fact, that end users cannot buy Windows Store content with their Work ID’s. Any Windows Store related purchase (e.g. movies or in-app purchase) will be tied to the private Microsoft account of an end user.
2.4 Look and feel after logon
As we were not authenticated against the store yet, let us grab an Azure AD test user and logon. After successful authentication, some new options are being displayed.
In addition to the public store, the private store is now available
The My Library tab displays the currently installed apps and the available apps that have been provided by the private store.
Note that these apps are not installed yet, these are simply published apps that can be installed by an end user that is logged on with his Azure AD credentials. It is just a link provided by IT to enable the end users Work Account to install an app.
2.4.1 Private app installation
As a next step, the installation of the app as an end user is being performed by choosing the published app and choosing install
Selected apps will be downloaded and installed:
2.4.2 Public app installation
The process of public apps installation is very similar. They key difference being that the corporate ID cannot be used to install public applications. A Microsoft account (formerly Live-ID) is required to use this functionality.
If an end user decides to logon with his Microsoft account, this will result in the following setup of My Library. A mix between the private content (Apps, Games, Music, Movies & TV) and the corporate content out of the private store.
2.5 Deactivate Microsoft account logon (live-ID)
Administrators like to keep their environment under control and may potentially want to hinder end users to logon to the Windows Store with their private Microsoft accounts.
You may have read something about a local Policy that might come in handy to block end users from logging on with Microsoft Accounts on corporate machines.
So I thought, ok could this be useful for the Windows Store? Will this block the end user’s ability to authenticate against the Store with Microsoft accounts?
After configuring the setting “Accounts: Block Microsoft Accounts” under “Computer Configuration\Windows Settings\Security Settings\Local Policies\Security Options” so that “Users can’t add Microsoft account”, let’s see what happens. Does it affect the Business Store?
Unfortunately, no it doesn’t.
This configuration does not hinder end users to logon to the App Store with their Microsoft account. All it does is to change the logon behavior of Windows itself.
If this setting is not configured, end users will be able to add their Microsoft account to the local machine and will as such be able to authenticate to their corporate client device with their private Microsoft accounts.
So restricting this simply prevents a local logon. The Windows Store app is not a Windows logon though. It simply is an authentication against the application.
This is the expected behavior as stated in the local policies explanation text: “This policy setting prevents users from adding new Microsoft accounts on this computer.”
Microsoft actually recommends to not configure this option. “If you disable or do not configure this policy (recommended), users will be able to use Microsoft accounts with Windows”.
Configuring this local policy will not change the behavior of the Windows Store app, instead if an end user tries to add a Microsoft account to his local machine using “Settings -> Accounts”:
The end user will now receive the following “meaningful” error message:
2.6 Offline app deployment
Note if not already done, go to your settings and enable the Offline licensing option
Offline licensing: Show offline licensed apps- this needs to be enabled if you want to see offline licensed apps within the app store.
Once enabled, search for an application and filter the apps:
Choose your app, and configure the offline licensing option
As stated, the offline app will now be displayed on your Inventory data and is marked as an offline app
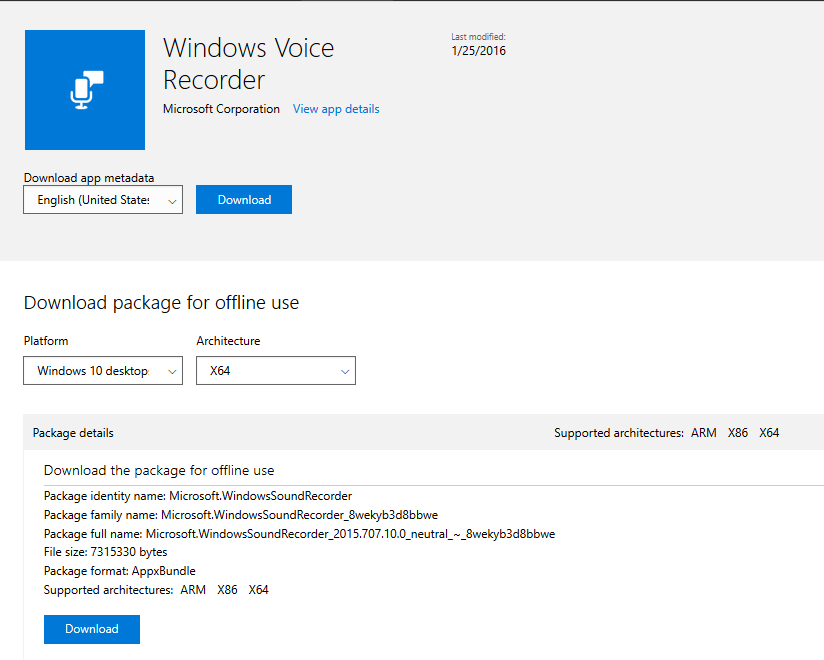
You can then download the required package information out of the Inventory for distribution with your Software Management tool or for your image integration
2.6.1 Enable Sideloading for unsigned apps
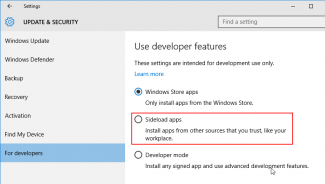
To deploy Windows apps that are not signed by the Windows store, the sideloading of apps has to be enabled first.
To do so, either navigate to Settings -> Update & Security -> For Developers and enable “sideload apps”
Or configure the GPO setting “Computer Configuration\Administrative Templates\Windows Components\App Package Deployment\Allow all trusted apps to Install” to enabled.
For additional information regarding the sideloading of apps, please refer to
2.6.2 Add an offline app to an image (iso, vhd, vhdx)
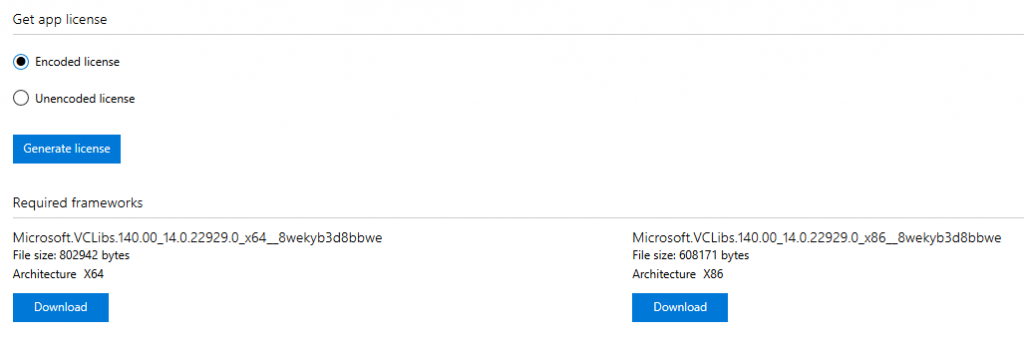
Download all required files out of the Offline Files business store inventory page and copy them into your application specific folder:
As already stated, offline licensed apps can be image integrated and as such can be managed by using DISM. Below are some commands that might come in handy.
Note that once a user has logged on to a client machine, it is not possible add or remove apps as packages cannot be serviced anymore, resulting in error: 2.
As such, the Offline servicing of virtual machines (vhd or vhdx) is not possible anymore once a user has logged.
Start a powershell console and run the following command to mount the image:
Dism /Mount-Image /ImageFile:Windows10_v1511.vhdx /index:1 /MountDir:F:\MountedImage
Install the app:
Dism /image:F:\MountedImage /Add-ProvisionedAppxPackage /PackagePath:%PathToFile%\Microsoft.WindowsSoundRecorder_2015.707.10.0_neutral.AppxBundle /DependencyPackagePath:%PathToFile%\Microsoft.VCLibs.140.00_14.0.22929.0_x64.Appx /LicensePath:%PathToFile%\Microsoft.WindowsSoundRecorder_License_Unencoded.xml
To get a list of all provisioned Apps within the mounted image run:
Dism /image:F:\MountedImage /Get-ProvisionedAppxPackages
To delete a provisioned App run:
Dism /image:F:\MountedImage /Remove-ProvisionedAppxPackage /Packagename:Microsoft.WindowsSoundRecorder_2015.1221.110.0_neutral_~_8wekyb3d8bbwe
2.6.3 Add an offline app to SCCM
Copy the binaries to your SCCM server:
SCCM requires a specific folder structure for the Application dependencies. The following sub-folders have to be created:
Dependencies\x64
Dependencies\x86
As a next step, copy the Microsoft.VCLibs.140.00_14.0.22929.0_x64.Appx into the x64 folder and the Microsoft.VCLibs.140.00_14.0.22929.0_x86.Appx file into your x86 folder, resulting in the following folder structure
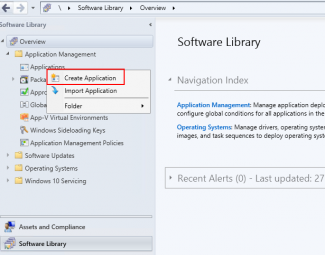
In SCCM create a new Application
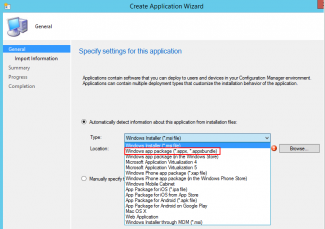
Choose the appxbundle, then select Browse and browse to your AppxBundle. Then continue with the default “Create Application Wizard” steps.
3 GPO’s | File Locations | behavior
Below is an overview of all Group Policy and Registry related settings that can be used to configure the Store for Business.
Group Policies related to the Windows Store can be found under:
Computer Configuration\Policies\Administrative Templates\Windows Components\Store
Similar configurations exist in the User part:
The installation directory of apps can be found under: “C:\Program Files\WindowsApps”
The User specific files can be found under: %localappdata%\Packages
The registry key of all installed applications can be found under:
HKEY_LOCAL_MACHINE\SOFTWARE\Microsoft\Windows\CurrentVersion\Appx\AppxAllUserStore\Applications
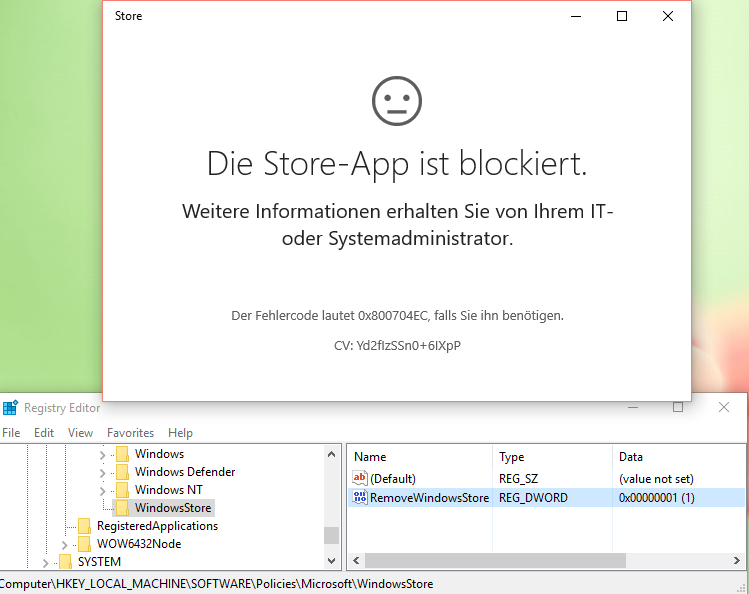
Setting the Registry Key HKLM\Software\Policies\Microsoft\WindowsStore\RemoveWindowsStore to 1 will disable the Store for Business:
3.1 Disabled Store – App behavior
I was wondering how preinstalled Apps behave if the Windows Store is disabled via GPO.
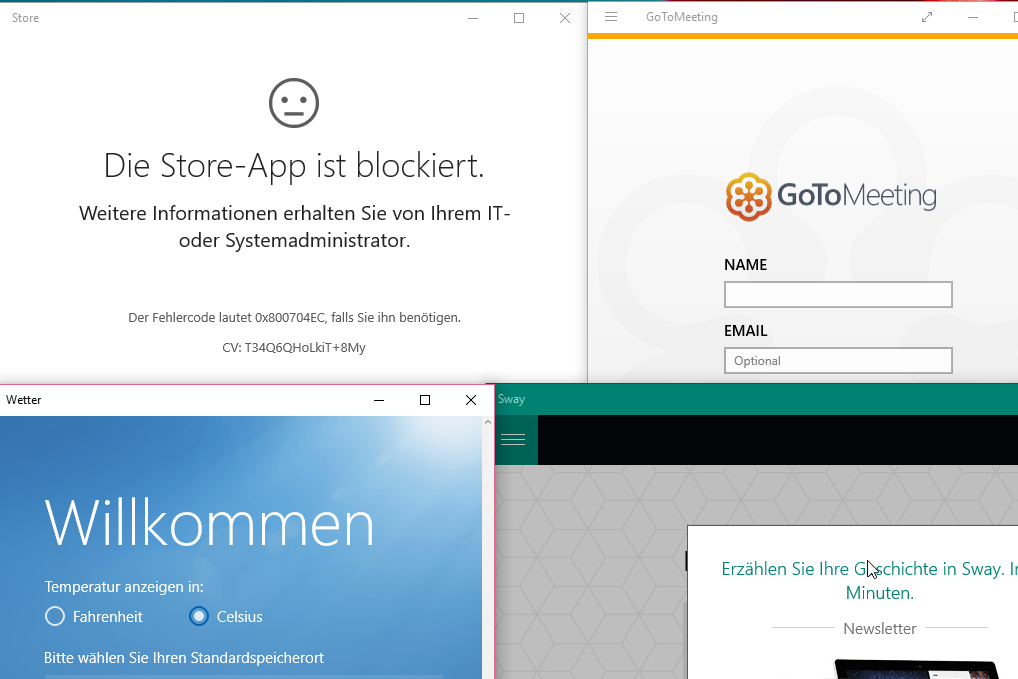
Will they still be functional? Yes they are. As you can see, the Store-App is actually blocked but the manually installed GoToMeeting app is still functional.
Same for all preinstalled apps like the Weather app or Sway. Both of them are fully functional.
4 Pros, Cons & Conclusions
This has become quite a long blog post, so what do we conclude of this? What are the Pros, the Cons? Should we keep the store enabled? Should we disable it or is there a middle ground?
Let us first have a look at the business side of things and talk about some potential negative effects in case of a fully activated Windows Store within a corporate environment:
– An end user may potentially install Home apps (such as OneDrive) on his enterprise client, which could result in some business downsides (File sync and Network traffic)
– The end users client may potentially end in an unmanageable state due to e.g. hard drive capacities:
- An end user will probably install several apps over the life span of his PC. Some of these could be quite large in size (Candy Crush?), which may result in disk space shortage. You never know how many apps will be installed by an end user over the PC’s life span I doubt an end user will ever remove any of his apps!
- In case of App updates. Will they automatically be downloaded? Will that affect the clients performance (CPU? Disk I/O?)?
- As stated, the privately used backup solution, could be setup to sync files to the business client, also resulting in hard disk space shortage.
– End users may potentially raise help desk tickets in case of malfunctioning Windows apps, resulting in higher workloads.
- Sure, you may simply close the ticket and state that it is not covered by any SLA. Will that increase the end users satisfaction? Probably not.
Ok, hm these are quite negative points you are raising there! So you want us to disable the store?
Well that is totally up to you. Will your end users expect the Windows Store to be active?
It may even increase the end users satisfaction and acceptance of corporate IT if you keep the store active, as it is closer to their home desktop experience.
So I guess you first need to have a close look at your current environment, what is the end users expectation? How much trust and freedom do you want to hand over to your end users?
My current preferred approach and recommendation would probably be to disable the store for end users but to keep it active as administrator.
Using this approach, Line Of Business (LOB) apps or any other Public app that supports the offline-licensed model could still be deployed within your corporate environment, by using:
– your Software Management solution (e.g. SCCM as described in Chapter 2.6.3) or
– by incorporating your offline licensed apps into your image.
As such you would keep your fully managed desktop environment but would still be able to benefit from the advantages that come along with the Windows Store for Business.
5 Encountered Issues
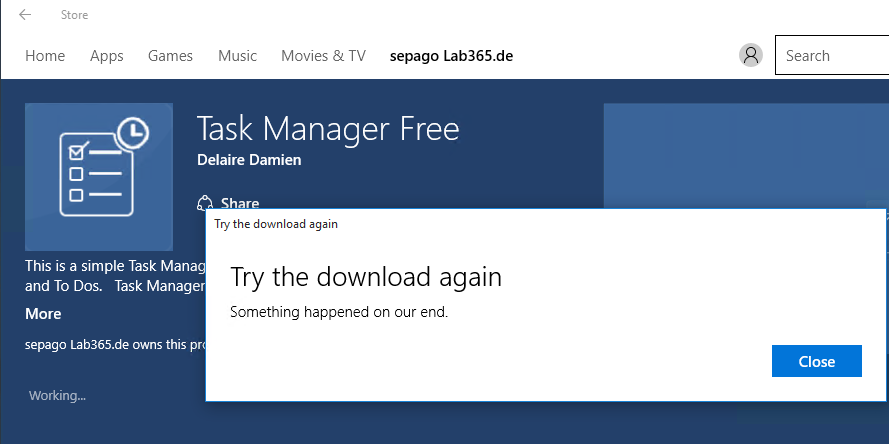
During my initial tests, I encountered the following error message. Not meaningful but… at least it does not seem to be my fault 😉
The private app that we published was not available for installation. Why is this happening? I found some other blog posts regarding this error message, indicating that the error message might be related to the regional settings of the client machine.
Apparently configuring your OS to “English – United states” solves this issue.
Under: Control Panel -> Region settings -> Change Format to (English (united states)), home location (united states) and system locale (English (united states)
This might be a workaround for home users but is not doable in a corporate environment. So I guess for now this might be a bug that might be fixed in future OS releases?


